
For a complete RAM and memory optimization guide, read: /ram-memory/
If you’re about to buy new RAM and you’re not sure how much your motherboard actually supports, stop for a minute.
I’ve seen people order 64GB kits only to realize their board supports 32GB max. Then comes the return request and the waiting.
Here’s how to check the real maximum RAM your motherboard supports on Windows 10 and Windows 11 quickly and correctly.
Method 1: Check Your Motherboard Model (Most Reliable)
This is the method I personally use before every upgrade.
Step 1: Find Your Motherboard Model
Press Windows + R
Type:
msinfo32
Press Enter.
Look for:
- BaseBoard Manufacturer
- BaseBoard Product
That’s your motherboard model.
One thing people miss: they look at “System Model” instead. That’s your PC model, not the motherboard.
Step 2: Check Official Specs
Now search your exact motherboard model and open the official manufacturer website (ASUS, MSI, Gigabyte, ASRock, etc.).
Go to:
Specifications → Memory
You’ll see something like:
- 2 DIMM slots
- Max 64GB
- DDR4 3200 MHz supported
That “Max” value is your real limit.
In most cases, this is the most accurate answer you’ll find.
Important Warning
Do NOT rely on random forums.
Don’t trust Amazon descriptions either they’re often outdated.
Always check the official spec sheet from the manufacturer.
Method 2: Use Command Prompt (Quick Check Not Always Accurate)
This method pulls the memory limit that Windows reports. Sometimes it’s correct. Sometimes it’s outdated.
Press Start, type cmd, right-click Command Prompt, and choose Run as administrator.
Then run:
wmic memphysical get MaxCapacity, MemoryDevices
Press Enter.
You’ll likely see something like:
MaxCapacity MemoryDevices 16777216 2
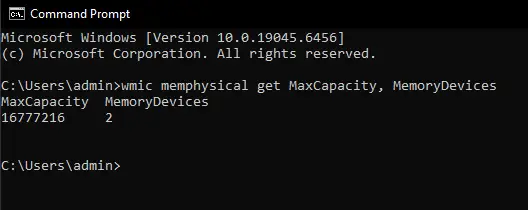
That MaxCapacity value is shown in kilobytes, which confuses a lot of people.
To convert it to gigabytes, divide the number by 1,048,576.
Example:
16777216 ÷ 1048576 = 16GB
That means the system reports a 16GB maximum capacity.
If this command doesn’t work or says it’s not recognized, that’s normal on some newer Windows 11 builds. Microsoft has been phasing out WMIC.
Usually, I use this as a quick reference, but I still double-check the motherboard’s official specs to be safe.
Method 3: Check BIOS (Good for Laptops)
This method works especially well on laptops where specs aren’t clearly listed online.
Restart your PC and press:
- F2
- DEL
- F10
(depending on your manufacturer)
Inside BIOS, look for:
- Memory Information
- System Information
- Maximum Memory
Some BIOS screens clearly show the maximum supported capacity.
If BIOS says 32GB max, don’t try installing 64GB. It likely won’t boot.
I’ve seen laptops go into boot loops because of this.
Common Mistakes People Make
- Confusing installed RAM with maximum supported RAM
- Ignoring how many slots exist
- Mixing DDR3, DDR4, and DDR5 (they are NOT interchangeable)
- Assuming Windows version is the main limit (motherboard matters more)
In most cases, budget laptops support less RAM than desktop motherboards.
Quick Checklist Before Buying RAM
Before you click “Buy”:
✔ Confirm motherboard model
✔ Check official maximum capacity
✔ Confirm DDR type (DDR4 or DDR5)
✔ Check number of slots
✔ Check maximum per slot
If you skip this, you might buy RAM that physically fits but doesn’t work properly.
Final Advice
If you want the safest answer, use Method 1 and check the official motherboard specs.
It takes two minutes.
And it saves you from ordering the wrong RAM kit.
FAQ
Does Windows 10 or Windows 11 limit how much RAM I can install?
Home editions have limits, but usually your motherboard limit is lower anyway. Check motherboard specs first.
Can I install more RAM than officially supported?
Sometimes it works. Sometimes it doesn’t.
If it fails, your PC may not boot or may only detect part of the RAM. I don’t recommend experimenting unless you’re comfortable troubleshooting.
How do I check how many RAM slots I have?
Open Task Manager → Performance → Memory.
Look for:
“Slots used: 1 of 2”
That tells you how many physical slots are available.